一、什么是Struts2
1.1 Struts2概念
- Struts2是一个基于MVC设计模式的Web应用框架,它本质上相当于一个
servlet,在MVC设计模式中,Struts2作为控制器(Controller)来建立模型与视图的数据交互。Struts 2是Struts的下一代产品,是在 struts 1和WebWork的技术基础上进行了合并的全新的Struts 2框架。其全新的Struts 2的体系结构与Struts 1的体系结构差别巨大。Struts 2以WebWork为核心,采用拦截器的机制来处理用户的请求,这样的设计也使得业务逻辑控制器能够与ServletAPI完全脱离开,所以Struts 2可以理解为WebWork的更新产品。虽然从Struts 1到Struts 2有着太大的变化,但是相对于WebWork,Struts 2的变化很小。
1.2 Struts使用优势
- 自动封装参数。
ModelDriven<T> - 参数校验
- 结果的处理(转发
dispatcher/重定向redirect) - 国际化
- 显示等待页面
- 表单的防止重复提交
二、搭建Struts2框架
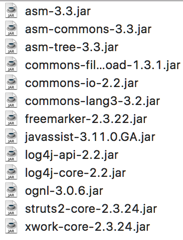
2.1 导包
2.2 书写Action类
package a_hello;

public class HelloAction {

    public String hello() {
        System.out.println("hello Action");
        return "success";
    }

    public String hi() {
        System.out.println("hello Action");
        return "success";
    }

    public String bye() {
        System.out.println("hello Action");
        return "success";
    }
}
2.3 配置src/struts.xml
<?xml version="1.0" encoding="UTF-8"?>
<!DOCTYPE struts PUBLIC
    "-//Apache Software Foundation//DTD Struts Configuration 2.3//EN"
    "http://struts.apache.org/dtds/struts-2.3.dtd">
<struts>
    <!-- package:配置Action类,相当于以前注册Servlet
                  多个action标签
            |- name: 必填项,随意填,唯一性的标示符(和其他package不能重复)
            |- namespace: 命名空间,当前包中action资源所在空间目录
                          不同的package,namespace可以重复
            |- extends: 继承-包,默认包 struts-default
            |- abstract: 专门用来被继承的包,默认false
     -->
    <package name="hello" namespace="/" extends="struts-default">
        <!-- action:配置Action类
            name:访问资源名,等同于以前的 url-pattern
                 最终资源名:namespace + name
            class:Action类对应的完整类名
            method:访问的方法名
         -->
        <action name="Hello" class="a_hello.HelloAction" method="hello">
            <!-- result:结果跳转
                    |- name: 方法对应的返回值
                    |- type: dispatcher(默认) - 转发
                             redirect(重定向)
                 标签体:
                     跳转的目标页面地址 - 服务器端路径
             -->
            <result name="success" type="redirect">/success.jsp</result>
        </action>
    </package>

</struts>
属性
package:配置Action类,相当于以前注册Servlet,<font color="red">包含</font>多个action标签name:必填项,随意填,唯一性的标示符(和其他package不能重复)namespace:命名空间,当前包中action资源所在空间目录。不同的package,namespace可以重复extends:继承-包,<font color="red">默认</font>包struts-defaultabstract:专门用来被继承的包,默认false
action:配置Action类,<font color="red">包含</font>多个result标签name:访问资源名,等同于以前的url-pattern。最终资源名:namespace + nameclass:Action类对应的完整类名method:访问的方法名
result:结果跳转name: 方法对应的返回值type:dispatcher(默认) - 转发redirect(重定向)
- 标签体:跳转的目标页面地址 - 服务器端路径
2.4 将Struts2核心过滤器配置到web.xml
<?xml version="1.0" encoding="UTF-8"?>
<web-app xmlns:xsi="http://www.w3.org/2001/XMLSchema-instance" xmlns="http://xmlns.jcp.org/xml/ns/javaee" xsi:schemaLocation="http://xmlns.jcp.org/xml/ns/javaee http://xmlns.jcp.org/xml/ns/javaee/web-app_4_0.xsd" id="WebApp_ID" version="4.0">
  <display-name>Struts2_day01</display-name>
  <welcome-file-list>
    <welcome-file>index.html</welcome-file>
    <welcome-file>index.htm</welcome-file>
    <welcome-file>index.jsp</welcome-file>
    <welcome-file>default.html</welcome-file>
    <welcome-file>default.htm</welcome-file>
    <welcome-file>default.jsp</welcome-file>
  </welcome-file-list>

  <!-- 下面的是极其重要的配置,一定要加上!!也只能加载web.xml中 -->
  <filter>
      <filter-name>Strust2</filter-name>
      <filter-class>org.apache.struts2.dispatcher.ng.filter.StrutsPrepareAndExecuteFilter</filter-class>
  </filter>
  <filter-mapping>
      <filter-name>Strust2</filter-name>
      <url-pattern>/*</url-pattern>
  </filter-mapping>
</web-app>
2.5 测试
三、Struts2访问流程
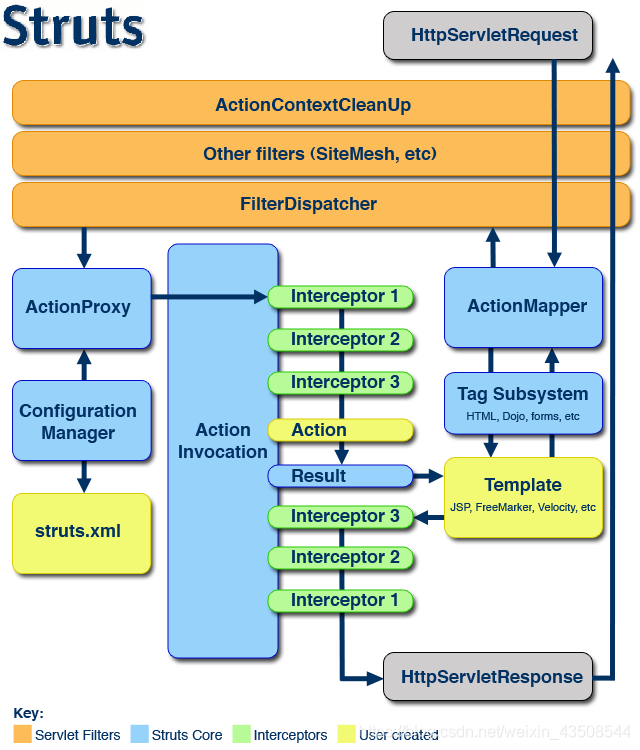
- <font color="red">黄色部分是要程序员自己写的</font>
特点
- 拦截器
Interceptor,是一部分功能 - 拦截器是可插拔式的
- 运用了AOP思想
- 拦截器
四、Struts.xml的详细配置介绍
<?xml version="1.0" encoding="UTF-8"?>
<!DOCTYPE struts PUBLIC
    "-//Apache Software Foundation//DTD Struts Configuration 2.3//EN"
    "http://struts.apache.org/dtds/struts-2.3.dtd">
<struts>
    <!-- 常量配置:默认选项 -->
    <!-- post提交方式编码设置
         struts.i18n.encoding=UTF-8 -->
    <constant name="struts.i18n.encoding" value="UTF-8"></constant>
    <!-- 资源后缀:action或者不填
         struts.action.extension=action,,
     -->
    <constant name="struts.action.extension" value="action,do,,"></constant>

    <!-- 动态方法调用开启 localhost:8080/struts/Hello!hello-方法名  method无需配置
         struts.enable.DynamicMethodInvocation = false -->
    <!-- <constant name="struts.enable.DynamicMethodInvocation" value="true"></constant> -->

    <!-- 开发模式:热加载
         struts.devMode = false -->
    <constant name="struts.devMode" value="true"></constant>

    <!-- 引入多个模块 -->
    <include file="a_hello/a_struts.xml"></include>
    <include file="b_action/b_action.xml"></include>
    <include file="c_result/c_result.xml"></include>
    <include file="d_servletapi/d_servletapi.xml"></include>
    <include file="e_param/e_param.xml"></include>
</struts>
4.1 常量配置
constant:常量配置struts.i18n.encoding:post提交方式编码设置,默认为UTF-8struts.action.extension:资源后缀,默认为action,,,action或者不填。struts.enable.DynamicMethodInvocation:动态方法调用开启localhost:8080/struts/Hello!hello-方法名method无需配置struts.devMode:开发模式:热加载
include:引入多个模块
4.2修改struts2常量配置(方式先后也是加载顺序)
4.2.1 方式一:src/struts.xml
<constant name="struts.i18n.encoding" value="UTF-8"></constant>4.2.2 方式二:在src下创建struts.properties
struts.i18n.encoding=UTF-84.2.3 方式三:web.xml
  <context-param>
      <param-name>struts.i18n.encoding</param-name>
      <param-value>UTF-8</param-value>
  </context-param>
五、Struts2配置的进阶(动态方法的调用)
5.1 方式一:!(method无需配置)
<!-- 动态方法调用开启 localhost:8080/struts/Hello!hello-方法名  method无需配置-->
struts.enable.DynamicMethodInvocation = true
5.2 方式二:_ (method="${1}")
<action name="Demo1Action_*" class="a_hello.HelloAction" method="${1}"> 
六、Struts2中的默认配置
<package name="default" namespace="/" extends="struts-default">
    <!-- 找不到包下的action,会使用Demo2Action处理请求 -->
    <default-action-ref name="Demo2Action"></default-action-ref>
    <!-- method属性:execute -->
    <!-- result的name属性:success -->
    <!-- result的type属性:dispatcher转发 -->
    <!-- class属性:com.opensymphony.xwork.ActionSupport -->
    <action name="Demo2Action">
        <result>/hello.jsp</result>
    </action>
</package>method属性:executeresult的name属性:successresult的type属性:dispatcher转发class属性:com.opensymphony.xwork.ActionSupport
七、书写Action的方式
7.1 方式一:POJO类
// 方式一:直接创建Action类,POJO类
// POJO:不继承任何类,也不实现任何接口
// 完美,减少了Struts的侵入性
public class Action1Demo {

}
7.2 方式二:实现Action接口
import com.opensymphony.xwork2.Action;

// 方式二:实现Action接口,Struts2提供的Action模版
// 里面有execute方法,提供action方法的规范
// Action接口预置了一些字符串,可以在返回结果时使用
public class Action2Demo implements Action {
    @Override
    public String execute() throws Exception {
        return null;
    }
}
7.3 方式三:继承ActionSupport类(重要)
// 方式三:(重要) 继承ActionSupport
// 帮助Action实现了以下接口:
// Action, Validateable, ValidationAware, TextProvider, LocaleProvider, Serializable
public class Action3Demo extends ActionSupport {
    public String hello() {
        System.out.println("Demo3Action hello");
        return SUCCESS;
    }
    public String execute() throws Exception {
        System.out.println("Demo3Action execute");
        return SUCCESS;
    }
}